
Winter RV Storage Checklist
Now that the RV season is coming to a close, you may be thinking about putting your baby away for the winter. If you’re a new RV owner, you’re probably wrestling with a few important questions. First, how do you go about winterizing your RV in order to keep it in good condition as it sits through those cold winter months? And second, where you should store your RV, motorhome, or trailer until next season?
Winterizing Your RV
There are a number of things that should be on your checklist to do prior to putting away the baby. Here is your winter RV storage checklist:
- Drain the RV Lines and Tanks
- Fill the Tanks with Antifreeze
- Jack the Tires
- Protect the Engine
- Remove the Batteries
- Disconnect the Electrical System
- Remove the Propane Tanks
- Seal your RV
- Guard Against Moisture
1. Drain the RV Lines and Tanks
If you’ve got an in-line filter online, remove this first. Then drain the holding tanks containing your fresh water. Next, drain your black water holding tanks and flush them using the built-in flushing system (if your RV has one), an RV reverse flush valve, or flush wand. Doing so will extend the life of your wastewater system as well as keeping your monitor panel accurate. It will also cut down odors from residual deposits.
Lubricate the termination valves with WD-40. Now, drain the water heater by opening the pressure release valve and removing the drain plug. Lastly, open all the faucets (kitchen sink, bathroom sink, inside shower, outside shower) as well as the toilet valve. Also, open the low-point drain valves under your RV and drain out the remainder of your fresh water tank.
If you want to go step further, you can install a blow-out plug to your water intake fitting and apply air pressure from an air compressor to drain the remaining water. (No more than 30 psi.) Close faucets and drains.
2. Fill the Tanks with Antifreeze
For those of you that live in colder climates where temperatures routinely go below freezing, you’ll definitely want to fill your lines with antifreeze. To do that, follow these steps. First, if you don’t have one already, install a water heater bypass line. This will ensure you don’t fill up your water heater with antifreeze. Now it’s time to add the antifreeze. Ensure that you’re using propylene glycol-type of antifreeze. It’s pink in color and is the best type for RVs due to its non-toxic, non-flammable nature. It comes in -50 and -100 freeze burst versions. Add antifreeze from either the inside using an installed water pump conversion kit. Here is a good video on how to install the water pump conversion kit. You can also add antifreeze using a hand pump from the outside. Turn on the water pump and give it a few moments to allow the system to build pressure. Open one faucet at a time (hot then cold) starting with the closest faucet. Keep open until you start seeing a steady stream of antifreeze coming out.
Now repeat these steps for each faucet as well as your outdoor shower. Don’t forget to flush the toilet until antifreeze comes out. Now, turn off the water pump and open one faucet to depressurize the system. On the outside of your RV, remove the small screen over the city water inlet and push the valve with a screwdriver until antifreeze appears. Put the screen back. Next, pour a pint or two of antifreeze down each drain as well as some into the toilet bowl to keep the blade seal from drying out.
If your water heater has an electric heating element ensure that it is turned off. Follow instructions for specific appliances such as washing machines or ice makers to winterize these items.
3. Jack the Tires
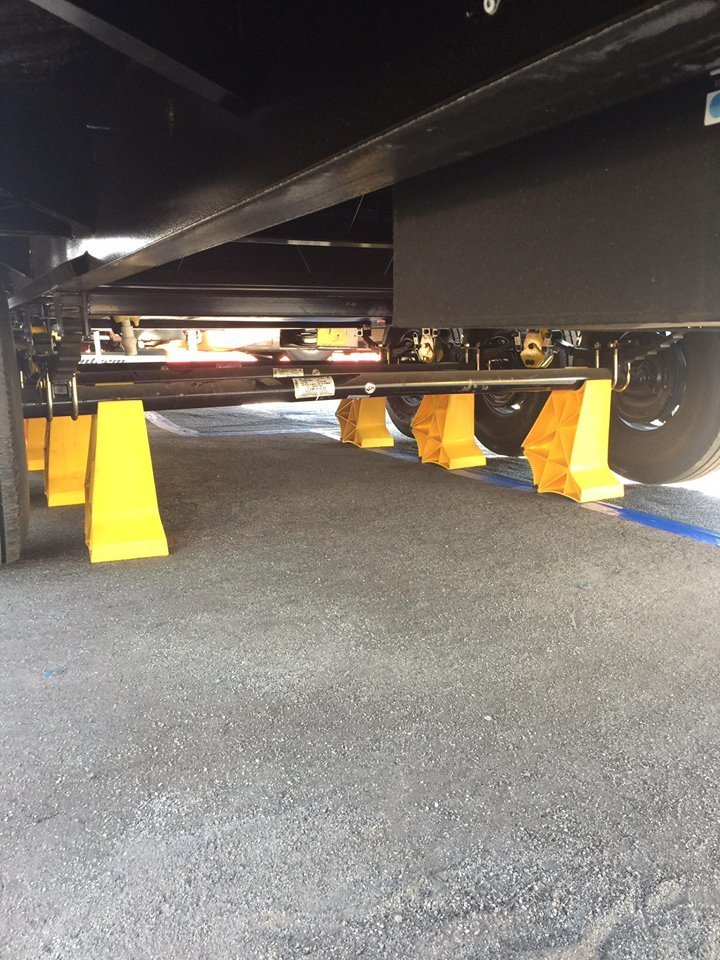 Over the winter months, if an RV hasn’t moved the tires can develop “flat spotting” due to the enormous weight being forced on them. This weakens the tire and can lead to a blowout. One way you can decrease this pressure is to lower your RVs leveling jacks (if your RV has these.) If your RV doesn’t have these, you should consider adding outside jacks. Alternately, you could use something called “TrailerLegs.” These high strength plastic stands slide under your RV and as you pull forward, they rotate and cradle your axle, lifting the wheels off the ground.
You can also just move your RV one-half tire revolution every month to two months to redistribute the weight. One thing you should definitely do is put a mat under each tire if you are keeping your RV on asphalt or concrete. This will keep the moisture in the surface from transferring to your tires.
4. Protect the Engine
For motorized RVs, you’ll want to completely fill your gas tank to prevent condensation (water) from accumulating in the tank. While you’re at it, add a fuel stabilizer and start the vehicle to let that run through your engine. Next, top-off the antifreeze in your radiator. Change the oil and oil filter, check the brake fluid and windshield wiper solution and top off if needed.
5. Remove the Batteries
Batteries are another item you’ll want to give attention to so that they are still in good condition when you start RVing again in the spring. If you live in cold climates and plan on storing your RV in an unheated environment, take your batteries out of the RV and keep them in a warm, dry place. Lidia Staron, a marketing manager at OpenLoans.com and avid RVer, says she checks each battery’s charge every four to six weeks with a voltmeter or multimeter and charges them as necessary. If you don’t live in an area that freezes, you should still disconnect the cables. Also, make sure your batteries’ fluid levels are topped off and they are fully charged.
6. Disconnect the Electrical System
Your RV’s electrical system and devices need attention too. First, shut off the main circuit breaker for your 120-volt or 240-volt AC system. Now, disconnect your 30-amp or 50-amp power cord from the outlet. Don’t forget to remove the batteries from appliances such as your smoke and monoxide detectors, flashlights, clocks, etc.
7. Remove the Propane Tanks
Remove your propane tanks at the end of the season and cover the tank connection with either tape or a plastic baggy and rubber band to keep water and insects out. Put the tanks in a dry place outside of the RV. You may want to get your tanks filled so they’re ready to go next season.
8. Seal your RV
If you plan on storing your RV outside for months at a time, you’re potentially making it a target for rodent infestation. Marshall Wendler, cofounder of CampAddict.com, advises that before you store it, be sure to inspect the outside and underneath with a fine-tooth comb. Seal any and all openings so that nothing can get inside. The tiniest crack is all it takes for a mouse to get inside. Rodents will devastate the inside of an RV, destroying wiring, plumbing, and any items stored inside your RV. This means checking seals at windows and doors, around the air conditioner, around vents, and other spots. Replace caulking if you find gaps or damage. While you’re at it, make sure all vents and cord covers are closed. Oh, and it should go without saying, but mice and insects are attracted to food. We advise removing all packaged food and even canned foods if you live in the frozen tundra because these can burst during super cold snaps.
9. Guard Against Moisture
 Before storing your RV for the winter, wash and wax it with a marine/RV cleaner wax to protect the exterior. Also, place an atmospheric control pack such as Desiccare’s SafeNDry inside your RV to absorb excess moisture and prevent tough odors from forming inside.
Additional Tips
- Extend your RVs awning and clean it well with a special awning cleaner to keep the awning pliable over the brutal winter months. You may want to invest in an awning cover to protect it further.
- Remove all your sheets, blankets, and mattress covers and wash them. Keep them in the house until you’re ready to camp again next season.
- Depending on how many trips you’ve taken you may want to get your RV’s wheel bearings repacked at a service center or by doing it yourself. Experts say that these should be repacked once per year if you use your RV frequently.
RV Storage
There are several choices when it comes to deciding where to keep your RV during the offseason. A big factor is your level of comfort and the knowledge that your RV has a certain degree of protection.
Storing your RV in the Driveway, Street, or Backyard
The most obvious choice is storing your RV in your driveway or backyard (or on the street if your neighborhood allows it.) The advantage of doing this is clear: you’ll be able to access your RV whenever you want, whether that’s to take an impromptu trip to the lake or to get that spare grill scraper you keep on your RV.
There are downsides to this storage option however. First, your RV is not truly secure, especially if you keep it on the street or driveway. RVs parked outside of homes are often targets of theft. If you decide to go this route, invest in some security measures such as window alarms and a good door lock. It wouldn’t hurt to get a wireless security camera either pointed at or inside your RV that sends you alerts of any activity.
Another downside is your RVs exposure to the elements. When you park your RV outside, you expose it to rain, snow, hail, leaves, or the silent killer of RV roofs—UV rays. You can mitigate this by purchasing an RV cover as Luca Sumberac, Category Manager for online RV parts retailer CAMPERiD.com, suggests. You can also buy an RV canopy to give the RV some measure of protection.
Storing your RV in a Storage Facility
Another option for where to put your RV is to store it at a self-storage facility that offers RV storage. As with the options above, storing your RV at one of these facilities has its positives and negatives.

Advantages of RV Self Storage
Protection
RV storage facilities typically have three options for storage, uncovered, covered, and enclosed. If you choose a covered or enclosed RV storage unit, you’ll be protecting your toy against the elements. This can extend the life of your RV by years.
Secure Storage
RV self-storage facilities have multiple layers of security. Typically, they feature 24-hour video surveillance with video cameras all over the property. Most facilities have a high fence around the perimeter of the property, and the access points institute a pin code keypad system where only customers with unique pin codes can enter or exit the property. Any entrances/exits are automatically logged into a computer system for later analysis if needed. And if you’re storing your RV in an enclosed storage unit, you’ll be able to lock your unit door with your own lock.
Additional Amenities
Many RV storage operations also offer their customers added amenities such as blackwater dumping stations, water tank filling stations, and wash/vacuum stations. Think of it as a “one-stop shop” to get your RV ready for the next trip.
Drawbacks of RV Self Storage
Limited Hours Depending on Location
While this all sounds great, there are some drawbacks to storing your RV at a storage facility. While some facilities offer 24-hour access, many have set access hours. The good news is that they are typically quite broad with many staying open from 6 am to 10 pm at night and even later. Chances are you won’t need to access your RV before or after these hours, but still it’s something to consider.
Cost
Second, there’s the cost. RV storage units are rented by the month and the prices range from around $100 a month for a small (10 x 20) uncovered storage slip, to as high as $500-$600 a month for a 14 x 50 enclosed storage unit with electricity and power door. Doing some simple math will tell you that these charges can add up quick and put a hurt on your pocketbook. But for many, this is the only way to go given the convenience and security RV self-storage offers. Some hedge their costs by choosing to just store their baby in a storage facility over the winter months to protect it, and then pulling it out for RV season. West Coast Self-Storage frequently offers introductory discounts that can reduce your overall storage cost significantly.
Conclusion
While it may seem like a lot of work to winterize and store your RV, you’ll be thankful that you did so when next camping season rolls around and your RV is still in great condition. Happy winterizing! If you’re just catching this article at the end of winter/beginning of spring, read our article, Getting Your RV Ready for the Summer.

About the Author: Derek Hines
Digital Marketing Specialist
Derek is originally from the great state of Wisconsin (go Badgers), but is slowly becoming a Pacific Northwesterner. As part of the Digital Marketing team, he writes extensively on storage, moving and life for West Coast Self-Storage, based in Everett, Washington.