
The Crawl Space: Is it a Storage Option?

 About a decade ago, we moved to Portland, Oregon from Minneapolis. After visiting my wife’s parents here a few times, we decided we could live with the rain instead of the -20 below wind chill, snow, and mosquitoes. As we started our home search, we started noticing a running theme to each Portland house. Very few, if any of them were built with a basement. Instead, most homes we looked at had crawlspaces of varying sizes. To compensate for the loss of the basement, many homes had a “bonus room”, a phrase that up until our move to the Pacific Northwest had not entered our lexicon.
We finally settled on a three-bedroom home with the requisite bonus room and a sizeable crawl space. The home was built on a hill, which allowed the crawl space to be 7 feet or higher in some places. My initial thought was that the builder should have spent the extra money to frame a walkout basement. But as with everything, you have to draw the line somewhere, and I’m sure that is what happened with the original owners of the home. But I reasoned that given this amount of space it would make for a great storage area.

crawl space before encapsulation
We moved into the home in February and shortly thereafter I did a thorough inspection of the crawl space. The builders had laid down a black plastic vapor barrier on the entirety of the crawl space ground. However, due to the undulations in the ground and the cement foundation supports, the vapor barrier was very uneven and torn in places where a wrong step went through the barrier, exposing the dirt floor underneath. But the ground was reasonably dry, which I took as a sign that this would be fine for storage.
So, I made the decision to make this our priority storage spot for the house. The builders had put down a few pieces of plywood that allowed for a small platform in front of the door to the space, but this needed major expansion if I was going to be able to fit all our family’s stuff down there. I calculated that a 12’ x 20’ platform would do the trick. My father-in-law and I put in several joists, which we anchored into the concrete foundation wall. On top of this, we laid down plywood to create the 12’ x 20’ storage area. Once finished, I put in a number of shelving units and brought down all of our extra storage items—holiday decorations, lawn furniture, sporting equipment, family memorabilia, etc.
I was very pleased with the result. Our garage was relatively free of clutter again and we had a safe, and secure place to keep our stuff.
I wish this were the end of the story. But sadly, it’s not.
The rest of the winter was uneventful. In fact, the next couple of years were uneventful regarding the crawl space. Or so I thought.
Destroyed Memories

destroyed photos
One very warm summer day, I went down to the crawl space to dig out some old photos that I was going to use for a family gathering. I grabbed the box that contained them and brought it into the house. Upon opening it, I was enveloped by a strong odor of mildew. I went back down to the crawl space and had a deeper look into what would have caused this. Sure enough, there was mold growing on the joists and practically everything I had in the crawl space contained mold.
This was devastating news. I immediately took everything out of the crawl space. For some items like the lawn furniture, I was able to wash them and lay them out in the sun to air out. For other items like our holiday decorations and memorabilia, I took them out and thoroughly washed the containers I had stored them in. Some of the items ended up in the garbage as the smell of mold never left. The remaining items I placed in a small storage unit I rented at West Coast Self-Storage.
But beyond the loss was the realization that the crawl space was not a suitable storage space after all. Even more than that, after some research I realized that the air we were breathing in our home was, at least in part, coming from the crawl space. We were breathing in moldy air. Our family had its share of allergies and colds, but I had never put two and two together that perhaps it was being caused by the crawl space.
Concrete or Plastic
I had only a couple of options if I wanted to return the crawl space to a usable state. The first option would be to pour a concrete slab. But according to Waterproof Magazine, retrofitting a crawl space with concrete is a bad idea because it can contribute to the moisture problems. Because there is no thermal break to stop the temperature difference between the warm moist air and the cold concrete surface, condensation will form and lead to more mold. You can get install an underslab moisture barrier prior to pouring the concrete, but this will add to the cost and may still not solve the moisture issues.
My other option was to install an impermeable crawl space vapor barrier in a process called “encapsulation.” These barriers, also known as crawl space liners or membranes, are typically made of reinforced polyethylene and can range in thickness from 6 mil (the minimum needed to stop moisture), all the way up to 90 mil with 12-20 mil being most commonly used in crawl spaces. (1 mil is equal to 1/1000 of an inch.) The barriers create a perfect seal to the crawlspace, thereby completely blocking moisture and creating a humidistatically-controlled environment.
Both of these options are expensive. Concrete slabs for my size of house would have run anywhere from $7,000 to $9,000. And the quotes I got for the vapor barrier ranged from a high of $14,000 to a low of $9,000. In the end, I opted for the vapor barrier for the reasons mentioned above.
After getting a few bids, I hired a company called Dr. Crawlspace to do the work. Greg, the owner, and his crew first sealed up the vents to the crawl space and tore out the old fiberglass insulation in the rafters. They installed a sump pump to carry away excess water and installed a commercial dehumidifier. Then they laid down a hard plastic dimple underlayment, which provided structure and stability to allow us to walk on it. It also acted as another layer of vapor protection. Next, they installed the vapor barrier itself, which ended up being a white, 16 mil, fire-retardant material called CrawlShield. They glued the fabric to the concrete walls and interior piers, making sure there were no places for leaks. Lastly, they sprayed foam insulation in between the wall studs around the whole crawl space to better insulate it.
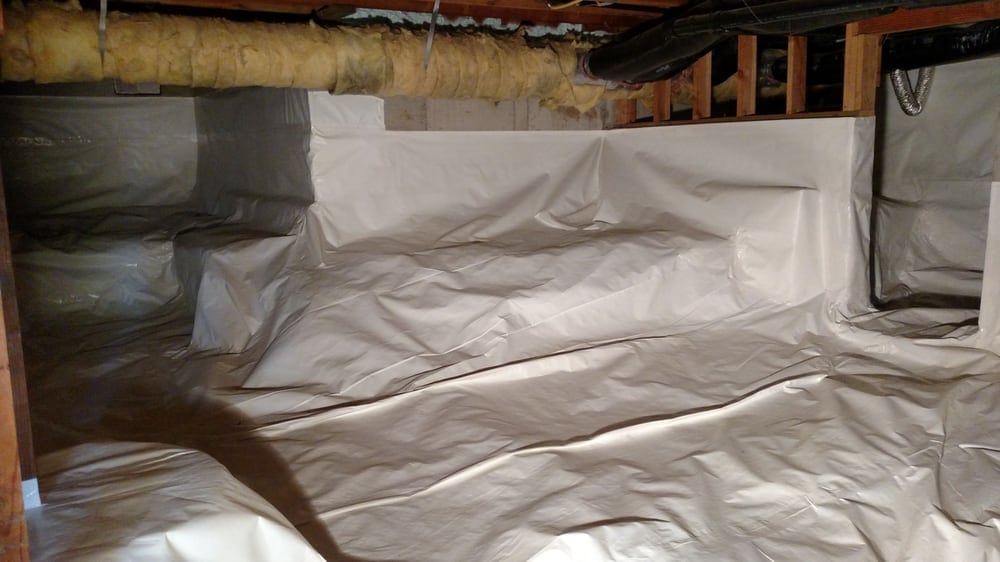
encapsulated crawl space
A Usable Space
The long and short of it is that I now have a crawl space that I can use again. The temperature stays between 60 and 65 degrees all year-round and the humidity level stays right around 40%. While I decided to keep the storage unit for certain items, I’ve been able to put most things back into the crawl space without having to worry about whether they’ll be destroyed by moisture or mold. And my family is breathing mold-free air.

About the Author: Derek Hines
Digital Marketing Specialist
Derek is originally from the great state of Wisconsin (go Badgers), but is slowly becoming a Pacific Northwesterner. As part of the Digital Marketing team, he writes extensively on storage, moving and life for West Coast Self-Storage, based in Everett, Washington.